Event Maintenance
Main
From the main menu bar, select
Click on the New button
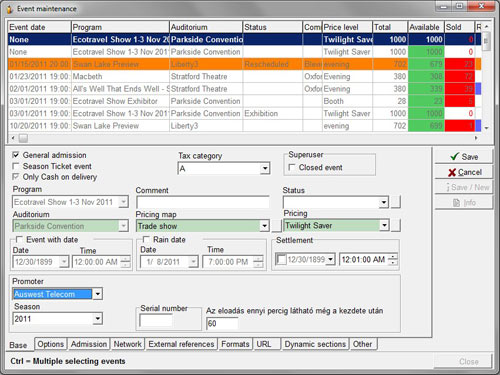
Check the General admission box if you are selling only general admission tickets to this event.
Leave the box unchecked if you are selling reserved seating.
Check the Season Ticket event box if your event will be included in any season/series you will later set up in Maintenance > Season Tickets > Season Ticket Maintenance.
From the Tax category drop down box, select a Tax category that will be included in the price of any tickets sold.
Note that you should always select a tax category even if you are not recording taxes.
The tax rate can be set to zero if you wish at Maintenance > Tax Values.
The Closed event checkbox enables Superusers (only), to close an event early for ticket sales.
If the event has been automatically closed by the system, then unchecking this box will make the event available for sales again.
Select a program from the drop-down Program box.
Enter any comment about the event listing as required for your reference only - not printed on tickets.
If required, select a Status from the drop-down list in the Status box.
Please do not create any new statuses as this feature is not fully active.
From the Pricing map drop down box, select the pricing map you wish to apply to this event.
If you need to create a new Pricing Map, click on the button at the right of the box. The Pricing Map Maintenance window will appear where you can set up new Price levels and select the regions on your seating map where these are to apply as explained at Maintenance > Programs > Set price levels.
From the Pricing drop down box, select the pricing you wish to apply to this event.
If you need to create any new Pricing for this event, click on the button at the right of the box. The Pricing Maintenance window will appear where you can set up a new Pricing Name and Prices as explained at Maintenance > Programs > Pricing.
Check the Event with date checkbox if the tickets you will be selling are for a specific time and date (and not like an exhibition or trade show for example where patrons can attend over a number of days).
NOTE: If you uncheck the Event with date box, you MUST also select “Exhibition” from the Status drop down list, otherwise your event will not be displayed in the Search window when selling tickets.
Events where no date or time is specified are always sold via Ticket transactions > Quick Transactions for Exhibitions.
Also be aware that tickets for Events without a date or time cannot currently be sold online.
Select the date of your event from the drop down calendar in the Date box, using the right and left arrows to select the required month.
Click on the date to select. Select the time of your event from the Hour field either by inserting the actual hours and minutes or highlighting any of the numbers displayed using the up and down arrows.
The Rain Date check box is used to set an alternative date for the event in the case of rain.
Check the box under Settlement if you wish to set a date by which your resellers must either return tickets allocated to them or else the tickets will be recorded as a sale to them.
From the drop down calendar, select your nominated settlement date and time.
In the Promoter drop down box, select a Promoter to be associated with this event (if required).
In the Season drop down box select the season that applies to this event.
NOTE: The Season here refers to the seasons you set up under Maintenance > Seasons and means the overall time period within which you wish to categorize a number of events, such as calendar year, or Spring season etc. It does not mean the seasons/series subscriptions which you may wish to set up under Maintenance > Season Tickets > Season Ticket Maintenance.
In the Serial number field, enter a serial number (optionally).
In the final field, Event shows in the Browser for xx minutes after starting time, insert the number of minutes you want the event to continue to be displayed in the main Browser window after the starting time of the event.
When all required information in the Event Maintenance window had been entered, both the Save button and the Save/New button will be fully visible and active.
If these buttons are not active, it means that some data still needs to be entered. If so, make sure in particular you have selected the Printing type and Ticket formats under the Formats tab.
Click on the Save button if this is the only Event you will be setting up in this session, or the Save/New button if you will be setting up additional events.
